|
 |
|
 |
Modification by P. Ryczek
Modification by S. Weiller
Modification by Orion83
The thermal noise is the fundamental raison for limiting QuickCam exposure time at 4-5 seconds. So for imaging deep sky, one must cool the camera's CCD sensor. One can use several methods for cooling the sensor : ice, nitrogen, CO2, Peltier module... The cheapest and more practical on the field solution is Peltier module cooling. It's a thermo-electrical module where cooling is created by electrons motion in semiconductor. The endothermic side freezes whereas the exothermic side produces heat. So it's essential to remove heat from the hot side with an oversized air heater, which can eventually be helped by a fan.
|
|
|
|
The following assembling has been made with a QuickCam Color 2, of which the CCD sensor (a color TC236P Texas) has been worthwhily replaced by a TC237 CCD sensor (the same sensor as used in the Bernard Dalstein's Kitty 237 CCD camera). It's a Black&White model (in reality the Texas data sheet is wrong, the 5 and 6 pins (OUT1 and OUT2) are inverted, but it doesn't really matter, images taken are the best proof), which is more efficient in weak light, and has a better resolution than the color sensor (because to make a color image, 3 pixels are needed). Be careful, it's not possible to replace the sensor of a QuickCam VC and QuickCam pro, because there is no equivalent Black&White sensor to this sort of color sensor. It's still possible to find Color 2 in american surplus (see address page).
 TC236P (color) |
TC237 (black & white) |
The aim is to use all which can be collected, the aluminum block will be reworked in the following way :
this in order to insert the CCd sensor on the cold finger, the sensor being mounted on " shrink model tulip holder " (1.78mm thread, Réf. Radiospares 187-2272, price 43FF)
|
 |
|
 |
|
 |
|
 |
|
 |
|
 |
One should obtain the following results at standard temperature :
The first trial is to take two images in complete dark with an 30s exposure time. The first one is taken at 34,4°C, so without any cooling. The second one is taken after 10 minutes of cooling at 10,3°C (3.5 A consumption under a 12V supply). The results are the two following images. They have been voluntary brighten to underline the thermal noise :
on the left side, 34°C - on the right side, 10°C
Comments would be frivolous....
One can now make real trials in deep sky imaging.
The following images have been taken at the center of a town, at the focus of a F/D=8 102mm fluo refractor.
CCD sensor temperature : 1.5°C . Some clouds, medium turbulence. Neither dark frame nor flat field frame have been made.Click on image to enlarge it :
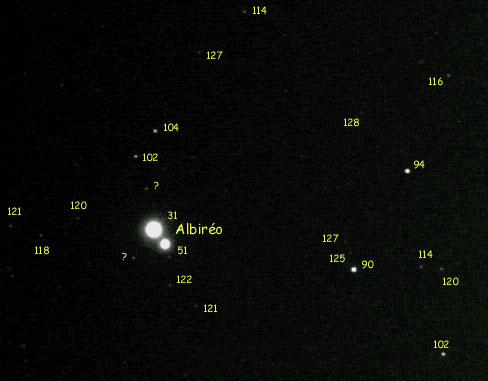
ALBIREO 9 exposures of 5 sec.
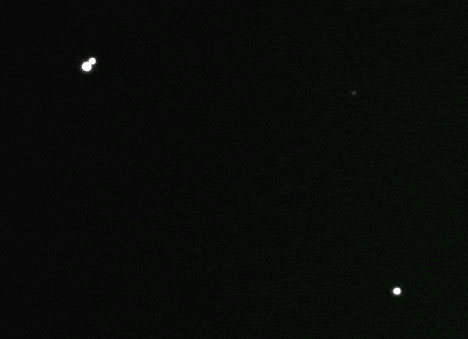
Some stars dimmer than 12th magnitude appear.MIZAR - ALCOR A single 5 sec exposure.
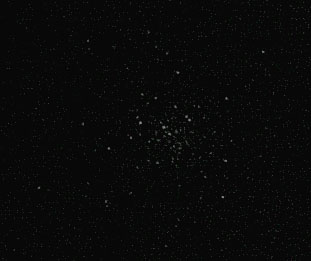
The small in the up and right corner is 7.59 th magnitude.M13 2 (only two !) exposures of 5 sec.
What a pity that more images haven't been taken ! It 's very promising...
You can find many other examples of cooling images in the gallery page.
We wanted to put the cooling QuickCam to the wall, so we tried to image nebulae and galaxies.
These images have been taken at "le col de Chavade", in the french department "Ardèche", at an height of 1300m , at the focus of a F/D=8 102mm fluo refractor. CCD sensor : -6°C, dark sky, very pure atmosphere and very low turbulence. Neither dark frame nor flat field frame have been made.
M27 - Dumbell Nebula 40 exposures of 5 sec.
One can notice the very low handles of the nebula.M51 - Retrievers Galaxy (???) 50 exposures of 5 sec.
Only central bulbs of M51 and its satellite can be seen.To make the comparison, here is an image taken by B.Daversin near Paris. The refractor is exactly the same, but the camera is a HX516 Xpress Starlight. 8 exposures of 2 min.
It's impossible to fight !!!
Conclusion
The trials of this cooling QuickCam are very interesting on every stellar objects such open clusters, double and variable stars and asteroids. Under a good sky, the 13.5 th magnitude is reached with a 102mm fluo refractor. Some serious studies can be considered : variable and double stars watching, asteroids astrometry, etc...
Nevertheless, we have to face the facts : it's almost impossible to image dim and nebular objects with a 5 seconds exposure. One must modify the software in order to compel the camera not to compose images of which the exposure time is higher tan 5 sec.
But we mustn't forget that the price of the whole cooling camera is lower than 1500FF, the black&white sensor and cooling system included. For this modest price, numerous applications are possible, and it's a great pleasure to see in real time (dim stars on the computer display.
As the previous system, this one uses a cooling by Peltier module, but the difference is that the CCD sensor isn't on the printed circuit itself, but is put between two plates, of which one is made of aluminum. More information on the web site of P. Ryczek.
images by P. Ryczek
Take a soda can. Pierce a
1"1/4 diameter hole in the bottom of the can. Cut the tight
part on the top. Make small spits all around the hole with a 1 cm
gap between each one. Turn down each split with pincers because
they have a very cutting edge. Recover a bottle top or a bottom
bottle, and drill a hole to help the USB cable going through it.
Put the QuickCam with some
foam to stuff. Put some adhesive plate on the plastic cover
plate. The QuickCam can remain in this way indefinitely. Put the
cooling system when you use the system.
Trials of
the system :
a) Dark frames with and
without cooling system
b) Images of mars with and without cooling system. The Control image is nicer (less turbulence at this moment), but we notice that some hot spots are missing on the cooled image with the same exposure time.
An original cooling system : recovering a CO2 refill (as used for paint ball guns), and spraying some CO2 on the rear of the CCD sensor (a QuickCam VC in this case). The advantage of this system is it needn't to unsolder the CCD sensor. More information on the web site of Orion.

Images from Orion83